COOPERATION MODEL
ARTIFICIAL INTELLIGENCE
PRODUCT ENGINEERING
DevOps & Cloud
LOW-CODE/NO-CODE DEVELOPMENT
INDUSTRY
FRONTEND DEVELOPMENT
CLOUD DEVELOPMENT
MOBILE APP DEVELOPMENT
LOW CODE/ NO CODE DEVELOPMENT
EMERGING TECHNOLOGIES



"No matter how good you get, you can always get better."
While ReactJS is renowned for its ability to build lightning-fast and dynamic UIs, performance optimization becomes crucial as your application scales. To ensure a seamless user experience, here are some key ReactJS optimization techniques to consider. By implementing React app performance optimization techniques, you can create a faster and more responsive user experience.
There is always room for improvement. React is well known for the ease that it provides for constructing fast and responsive UIs, yet as the application grows, it may become slow if you don’t optimize it properly. Whether you’re managing your project in-house or outsourcing React development services, these optimization strategies can significantly enhance performance.
In this post, we'll talk about them and find out how to deal with the performance issues of Reactjs apps, underscoring the importance of continual improvement in your development process.
Optimization, when done right, improves page loads and user interactions and reduces overall costs. Plus, optimized code is easier to maintain, debug, and scale over time. Without it, even well-built React apps can suffer from slow rendering and high memory usage. App performance impacts user retention and satisfaction.
React’s virtual DOM helps speed things up by cutting down on direct DOM updates. But if your components re-render too often or aren’t structured well, you could end up slowing things down instead. Things like mismanaged state, unnecessary API calls, or heavy components that don’t use memoization can eat up processing power. If left unchecked, this can lead to slow load times, choppy animations, etc.
It’s worth noting that while these techniques focus on ReactJS, many optimization principles cross over to mobile development. Whether you’re refining a ReactJS web app or building mobile applications with React Native, effective state management and minimizing unnecessary re-renders remain key.
For mobile developers, exploring React Native Best Practices can further extend these benefits, ensuring smooth and responsive user experiences across platforms. If your React app is slow or hard to scale, a performance audit can help figure out what’s slowing it down.
Brilworks, a top-rated React development company, digs into everything, including unnecessary re-renders, memory leaks, and third-party scripts. We will lay out a clear plan to fix them. Whether it’s upgrading to React 18, cleaning up legacy code, or optimizing builds, we help keep your app fast, reliable, and cost-efficient.
Don’t let performance issues drag your app down. Get in touch with Brilworks, and we will help you get things running the way they should.
React’s Virtual DOM is a core optimization tool that reduces direct interaction with the browser’s actual DOM, which is slow and resource-heavy. Instead of updating the real DOM on every state change, React creates a lightweight virtual copy.
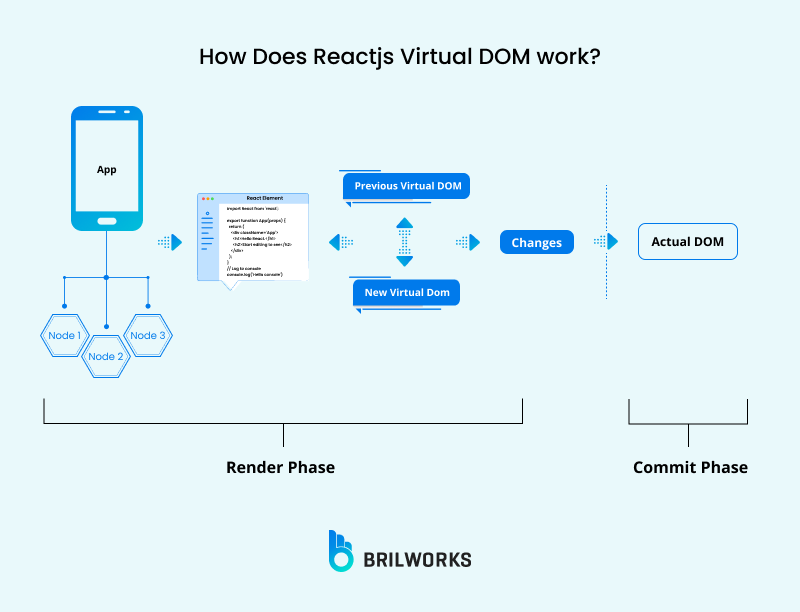
When changes occur, React compares this virtual copy with the previous version (a process called diffing) and updates only the necessary parts of the real DOM. While this approach minimizes costly DOM operations, its efficiency depends entirely on how developers structure components and manage state.
However, React’s default rendering behavior has a critical limitation. When a parent component’s state updates, React re-renders all its child components by default, even if those children do not use the updated data.
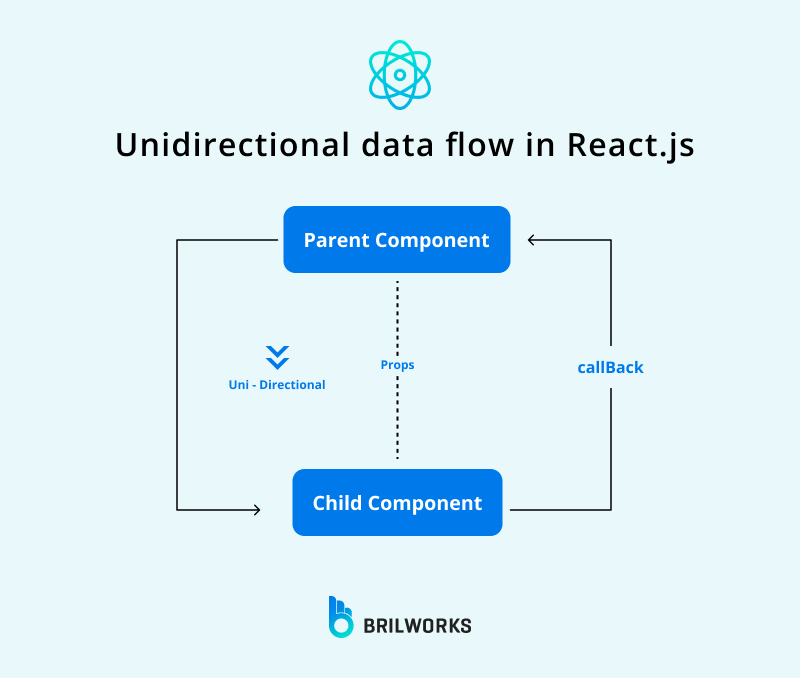
For example, changing a filter in a parent component might force unrelated charts, buttons, or tables in child components to re-render unnecessarily. In complex applications, these redundant re-renders waste processing power, increase memory usage, and slow down the user experience.

To optimize your React application and prevent unnecessary re-renders in child components when state updates in a parent component, you can follow a few strategies. React provides several mechanisms for optimizing re-renders, and here are some common approaches:
By default, React re-renders a component whenever its props change. This is normal behavior, but it can cause performance issues.
Imagine a component that does heavy work, like fetching data from a server. If React re-renders this component 10 times, it’ll fetch the data 10 times, even if the data hasn’t changed. This wastes time, server resources, and slows down your app.
Memoization fixes this.
When you wrap a component with memo, React saves a "snapshot" of its output based on its props. The next time React tries to re-render the component, it first checks:
"Have the props changed since the last render?"
No? React reuses the saved snapshot. No heavy work is repeated.
Yes? React re-renders normally.
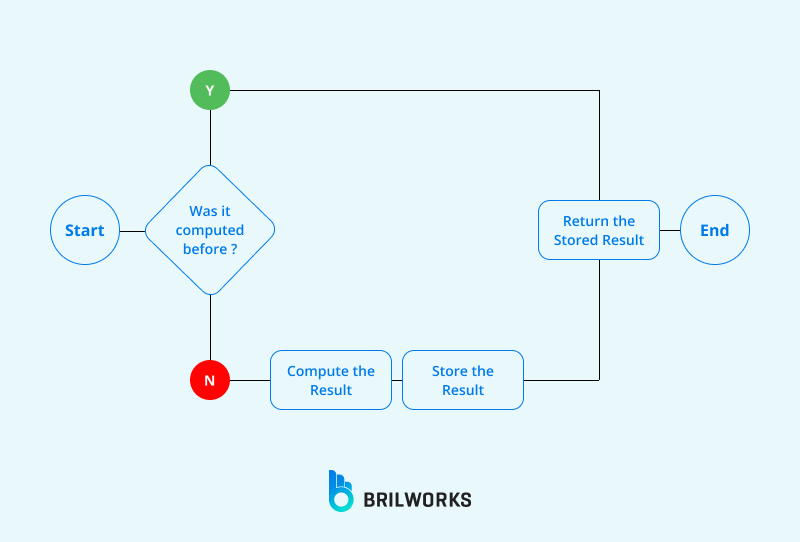
This is like a cook reusing a pre-made dish instead of cooking from scratch every time the same order comes in.
import { memo } from 'react';


const Greeting = memo(function Greeting({ name }) {

  // This only runs when the "name" prop changes

  return <h1>Hello, {name}!</h1>;

});


// Usage:

<Greeting name="Alice" />

<Greeting name="Alice" />  // Uses cached version
Here, even though <Greeting> is used twice with the same name, the component only runs once. The second instance uses the cached result.
Use memoization when:
Don’t overuse it:
Memoization adds some overhead. Only use it where performance gains are clear.
Instead of passing the entire parent component's state, send only the data that the child component requires. This approach helps prevent the child component from unnecessary re-rendering when unrelated changes occur.
Let's say you have a parent component that manages a user profile and consists of various pieces of data, such as the user's name, email, and profile picture. You also have a child component responsible for displaying the user's name.
Instead of passing the entire user profile object, you can pass only the user's name as a prop to the child component. By doing this, changes to the user's email or other profile data in the parent won't trigger unnecessary re-renders of the child component, as it only relies on the user's name.
When you pass a function (like an event handler) from a parent to a child component, React creates a new function instance on every parent re-render. Even if the function logic hasn’t changed, the child component sees it as a "new prop" and re-renders unnecessarily.
Example Without useCallback:
function Parent() {

  const handleClick = () => {

    console.log("Button clicked!");

  };


  return <Child onClick={handleClick} />; // Child re-renders every time Parent does

}
Here, handleClick is recreated on every Parent render. The Child component thinks its onClick prop changed, so it re-renders even if nothing actually changed.
Memoize the function with useCallback.
import { useCallback } from 'react';


function Parent() {

  const handleClick = useCallback(() => {

    console.log("Button clicked!");

  }, []); // No dependencies = same function forever


  return <Child onClick={handleClick} />; // Child won’t re-render unnecessarily

}
What useCallback Does:
It saves the function in a "cache" and reuses it across re-renders.
The child component sees the same function reference every time, so it skips re-renders (if it’s memoized with memo).
When to Use It:
When passing functions to memoized child components (memo or PureComponent).
For functions used in dependency arrays (e.g., useEffect).

Don’t Overuse It:
Only apply it to functions that actually cause performance issues.
Avoid if the function depends on changing state/props (add those to the dependency array!).
Code splitting in React is a way to make your web app faster by loading only the code needed when a user interacts with it rather than all at once. This technique improves page loading speed, especially for larger applications. Here's a simplified explanation of how it works:
In a typical React app, all the code is bundled into a single large file, making it heavy and slow to load. To make the app faster, you can split the code into smaller pieces using dynamic imports. Instead of loading everything up front, you load code only when it's needed.
How to Implement Code Splitting
1. Replace your normal imports with dynamic imports. For example, change this:
import Home from "./components/Home";

   import About from "./components/About";
to this:
  const Home = React.lazy(() => import("./components/Home"));

   const About = React.lazy(() => import("./components/About"));
2. Use a `Suspense` component to show a loading message while React loads the code for a specific component. Like this:
<React.Suspense fallback={<p>Loading page...</p>}>

     <Route path="/" exact>

       <Home />

     </Route>

     <Route path="/about">

       <About />

     </Route>

   </React.Suspense>
When a user visits your app, React loads only the code needed for the initial view. If the user goes to a different part of your app, React loads that code on demand, making your app faster and more responsive.
In simple terms, code splitting in React breaks your app's code into smaller pieces and loads them only when necessary, resulting in a faster and more enjoyable user experience.
Webpack 4 offers two modes: development, which is the default, and production. By switching the mode to "production," you instruct Webpack to optimize your code for production-ready deployments. To configure the mode in your Webpack setup, follow these steps:
module.exports = {

  mode: 'production',

  // Other Webpack configuration options...

};When working on your React app, performance can be slow due to extra baggage in the form of unused dependencies. Over time, you might have added libraries or packages that were useful at one point, but now they are just there. They can make your bundle heavier than necessary. This extra weight can lead to longer load times.
The first step is to take a good, hard look at your package.json file. It’s a good idea to go through each dependency and ask yourself, “Do I really use this? Is it still necessary?” Sometimes, a dependency might have been essential for a feature that’s since been removed or replaced. In these cases, it’s best to cut the dead weight.
A practical tip here is to use tools like depcheck. This handy tool scans your project and tells you which dependencies aren’t actually being used. It gives you a clear list of candidates for removal, so you can confidently clean up your codebase. Not only does this help in reducing the overall bundle size, but it also minimizes potential security risks and reduces maintenance overhead.
Remember, every extra line of code or unnecessary package can impact your app’s speed, especially as your project grows. By regularly reviewing and optimizing your dependencies, you keep your app lean and mean, ensuring that your users get the fast and responsive experience they expect.
Taking the time to streamline your dependencies is a smart move for any React developer. It’s one of those behind-the-scenes tweaks that can make a big difference in performance without requiring a complete overhaul of your code. So, give your project a little spring cleaning every now and then—your app’s speed and your future self will thank you.
Lazy loading trims down the initial load time. It only brings in what is necessary at the moment rather than loading all images upfront.
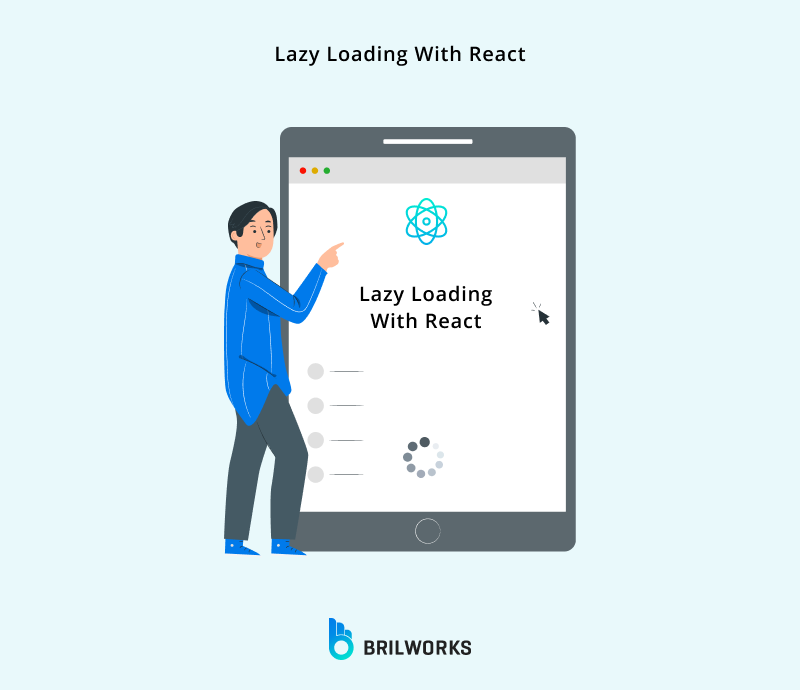
By enabling lazy loading, you can instruct the DOM not to load all images upfront but instead to load them as users scroll down and reach them.
Use the React lazy function along with the Suspense component to enable lazy loading. Here are the steps to enable lazy loading in React.js:
Create Separate Components: First, organize your application into separate components that you want to load lazily. These can be functional or class components.
Import the lazy Function: Import the lazy function from React. You can use it to import your components dynamically.
import React, { lazy, Suspense } from 'react';Wrap Components with Lazy: Use the lazy function to import your components lazily. For example:
const LazyComponent = lazy(() => import('./LazyComponent'));Make sure to provide the correct path to your component's file.
Use Suspense Component: To handle the loading of lazy components, wrap them with the Suspense component. You can specify a fallback to be displayed while the lazy component is loading. For example:
function App() {

  return (

    <div>

      <Suspense fallback={<div>Loading...</div>}>

        <LazyComponent />

      </Suspense>

    </div>

  );

}In applications with extensive item lists, such as social media apps, e-commerce platforms, and music streaming services, it's important to note that ReactJS, by default, re-renders the entire list whenever any changes occur.
Let's say you have an e-commerce website with a product catalog that contains thousands of items. Without virtualization, if a user scrolls down the product list, React would re-render the entire list every time, even if only a few items are visible on the screen.
With virtualization implemented, React creates a virtual representation of the list and only renders the items that are currently in the user's view. As the user scrolls, React dynamically updates and reuses components for the visible items, reducing the unnecessary re-renders of the entire list.
This approach significantly improves the website's performance because it reduces the load on the browser and makes the user experience smoother, especially when dealing with extensive lists of items.
To enable virtualization, you can employ the "windowing" technique, which renders only a small subset of your rows, significantly reducing the time required for re-rendering. You can use the FixedSizeList component from the react-window library to display a large list of items efficiently.
import { FixedSizeList as List } from 'react-window';


const Row = ({ index, style }) => (

  <div style={style}>Row {index}</div>

);


const Example = () => (

  <List

    height={150}

    itemCount={1000}

    itemSize={35}

    width={300}

  >

    {Row}

  </List>

);
When the FixedSizeList component renders, it creates a virtual DOM representation of the list. It then renders only the items that are currently visible in the viewport. In this example, only the first 4 items in the list will be rendered initially.
This code effectively displays a list of 1000 items, even though the visible area is only 150 pixels high. As the user scrolls through the list, the FixedSizeList component dynamically updates the DOM to render the newly visible items, providing efficient and performant rendering.
Additionally, you can use React-virtualized, a powerful library that can help you improve the performance, memory usage, and battery life of your application.
When React updates a list of things, it compares a copy it makes in its memory to the real list you see on the screen. If we don't give each item a special tag, React has to check the whole list every time something changes. This can be slow for long lists. But if we assign a special key to each item, React can quickly see what's different, making things faster, especially with long lists. Therefore, each child in a list should have a unique “key” prop.
For example:
<li key={person.id}>...</li>When you’re building a React app, you sometimes run into functions that do some heavy lifting—think sorting huge arrays or crunching complex numbers. If these calculations run on every render, they can slow your app down considerably. That’s where useMemo comes in handy.
useMemo is like having a smart helper that remembers the result of an expensive calculation. You wrap your function in useMemo, and it only re-computes the value when its dependencies change. In other words, if nothing relevant has changed, it just hands back the saved result, saving your app from unnecessary work.
For instance, if you have a function that processes a big dataset, running it every time your component renders can eat up processing power. By using useMemo, you ensure that the function only runs once when needed, rather than on every render. This small tweak can really help speed things up.
Here’s a quick example:
const processedData = useMemo(() => { return expensiveCalculation(data); }, [data]);In this snippet, React will only call expensiveCalculation when the data changes. If the data stays the same, it’ll just use the stored result. This keeps your component lean and mean.
When building a React app, it’s tempting to define functions right inside your render method because it feels quick and easy. But here’s the catch: every time your component re-renders, these inline functions are recreated. This might not seem like a big deal, but if you’re passing these functions as props to child components, they can trigger unnecessary re-renders, which in turn can slow your app down.
Think of it this way: if you pass a new function on each render, React sees it as a new prop—even if the logic inside hasn’t changed. This extra work can add up, especially in larger applications with many components. To avoid this, it’s a good idea to pull those functions out of the render method.
For class components, you can define these functions as methods on the class. For functional components, the useCallback hook is your friend. useCallback memoizes your function so that it only gets recreated when its dependencies change, helping to keep your components lean and efficient.
Here’s a quick example of what to avoid:
// Not ideal: Inline function in render

<MyButton onClick={() => handleClick(item.id)} />
And here’s how you can improve it using useCallback:
const handleClickCallback = useCallback(() => {

  handleClick(item.id);

}, [item.id]);


<MyButton onClick={handleClickCallback} />
By moving these functions out of the render flow, you help React recognize when nothing has really changed, preventing unnecessary updates. This little tweak can go a long way in making your React app more responsive and efficient, especially as it grows in complexity.
When using React Context to share data across your app, it’s super handy—but it can also slow things down if you're not careful. Every time the context value changes, all the consumers re-render, even if only a small part of that value was updated. This can cause unnecessary re-renders, especially in larger apps.
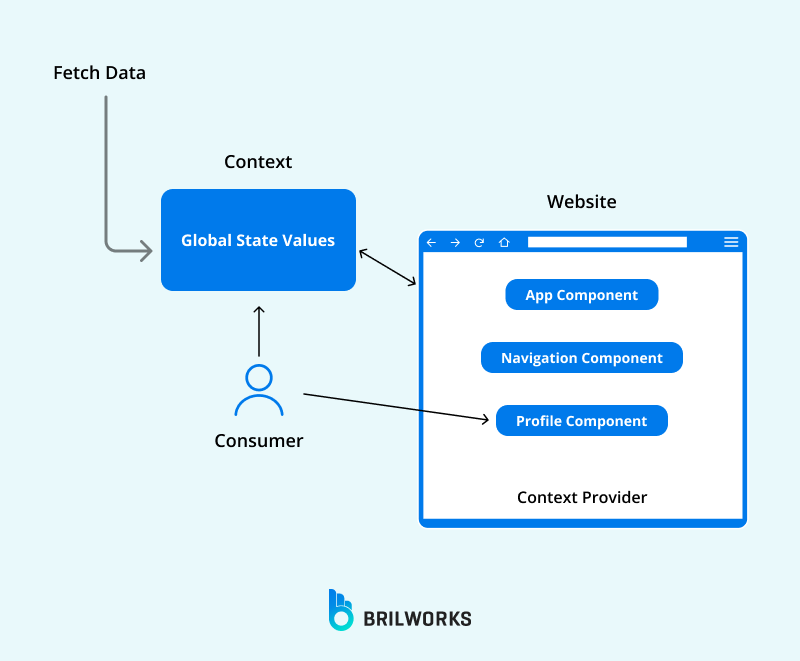
To avoid this, start by keeping your Context Providers lean. Only include the state and functions that actually need to be shared. If you have a provider that’s handling unrelated pieces of state—like theme settings and user data—consider breaking it up into smaller, focused providers. This way, a change in one piece won’t force every consumer to re-render.
Another trick is to wrap the value you pass to the provider in useMemo. This ensures that unless the underlying state changes, the value remains the same, which helps prevent needless updates. Here’s a quick example:
const themeValue = useMemo(() => ({ theme, toggleTheme }), [theme]);


return (

  <ThemeContext.Provider value={themeValue}>

    {children}

  </ThemeContext.Provider>

);
By memoizing your context value, you keep the provider from triggering updates unless it really needs to. This small tweak can make a big difference in your app’s responsiveness.
In short, streamline your Context Providers by keeping them focused, splitting up complex providers, and using memoization to guard against unnecessary re-renders. These adjustments help ensure that your React app stays fast and efficient, delivering a smooth experience for your users.
When you're tuning up your React app, bundle analysis tools are a real lifesaver. These tools let you peek inside your final build to see exactly what's in there and how much space each part takes up. Think of it like opening up a toolbox—you get to see which tools are taking up too much room and which ones you might not even need.
Tools like webpack-bundle-analyzer or source-map-explorer break down your bundle, showing you a visual map of your modules and dependencies. This way, you can spot the heavy hitters that might be dragging your app's performance down. Maybe you find a bulky library that you barely use, or notice that your code isn’t being tree-shaken effectively.
Once you know what's causing the bloat, you can take action—whether that means switching to a leaner alternative or refactoring your code with code splitting and lazy loading. Regularly running these tools helps you stay on top of any unexpected increases in bundle size. It's like giving your app a regular check-up to ensure it's running as efficiently as possible. By keeping your bundle lean, you not only improve load times but also enhance the overall user experience.
So, if you want to keep your React app firing on all cylinders, bundle analysis tools should be a staple in your performance optimization routine. They give you the insight needed to trim the fat and make sure every piece of code is truly pulling its weight.
React 18 has some pretty cool features that let you manage updates smarter. Two of these—useTransition and useDeferredValue—help you give priority to urgent updates, like user input, while putting off less critical ones, such as loading search results.
Imagine a user typing into a search box. They expect things to happen instantly. With useTransition, you can tell React, “Hey, this update is high-priority!” That means while the user is typing, React makes sure their input feels immediate and responsive. Meanwhile, non-urgent updates—like filtering or displaying search results—can wait just a bit until the important stuff is sorted out.
useDeferredValue works in a similar way. It lets you delay the display of non-urgent data if a more critical update is coming in. This means your app won’t get bogged down trying to show everything at once. Instead, it focuses on what the user really cares about right now, keeping the experience smooth and snappy.
Here’s a simple example using useTransition:
In this code, the filtering of results is wrapped inside startTransition. That way, while the app is busy updating the search results, it still prioritizes the user’s keystrokes, making sure the input stays responsive.
import { useState, useTransition } from 'react';


function SearchComponent({ results }) {

  const [input, setInput] = useState('');

  const [filteredResults, setFilteredResults] = useState(results);

  const [isPending, startTransition] = useTransition();


  const handleChange = (e) => {

    const newInput = e.target.value;

    setInput(newInput);


    // Mark the filtering update as non-urgent

    startTransition(() => {

      const newFilteredResults = results.filter(result =>

        result.toLowerCase().includes(newInput.toLowerCase())

      );

      setFilteredResults(newFilteredResults);

    });

  };


  return (

    <div>

      <input value={input} onChange={handleChange} placeholder="Search..." />

      {isPending ? <p>Loading...</p> : <ul>{filteredResults.map(item => <li key={item}>{item}</li>)}</ul>}

    </div>

  );

}
By taking advantage of these React 18+ features, you ensure that your app handles important interactions first. This approach not only makes your app feel faster but also improves the overall user experience—keeping things running smoothly even when there’s a lot going on in the background.
In this blog, we've delved into the intricacies of optimizing ReactJS applications for peak performance. From understanding the nuances of DOM manipulation to employing methods such as memoization, prop optimization, and callback functions, we've explored the key strategies to enhance your React application's efficiency.
Dynamic code splitting through dynamic import(), utilizing production mode Webpack, and optimizing dependencies are highlighted as effective measures. Additionally, we've emphasized the significance of enabling lazy loading and provided insights into optimizing list rendering by assigning keys to list items.
As your React application evolves, the significance of optimization techniques on user experience and overall functionality cannot be overstated.
Ready to elevate your application's performance and security? Reach out to us now and hire React.js developers.
Optimizing your React application leads to a smoother user experience, faster page loading times, and reduced resource consumption. This translates to happier users and a more efficient app.
Unnecessary re-renders, large initial bundles, and inefficient list rendering can significantly impact performance. Additionally, excessive DOM manipulation and poorly optimized dependencies can contribute to slowness.
Use the memo function to wrap your component and define the props that trigger re-rendering. This ensures the component only re-renders when the relevant props change.
Code splitting breaks your app's code into smaller chunks that are loaded only when needed. This reduces the initial load time and improves responsiveness.
Use libraries like react-window or react-virtualized to implement virtualization. This technique only renders the visible items in the list, dramatically improving performance for large datasets.
Production mode Webpack optimizes your code for deployment by minifying and removing unnecessary code, resulting in smaller bundle sizes and faster loading times.
Use the React.lazy function and the Suspense component to load images only when they are scrolled into view. This reduces the initial load time and improves perceived performance.
Avoid unnecessary state updates. Use immutable data structures. Profile your app to identify performance bottlenecks. Utilize performance monitoring tools.
Get In Touch
Contact us for your software development requirements
Get In Touch
Contact us for your software development requirements