COOPERATION MODEL
ARTIFICIAL INTELLIGENCE
PRODUCT ENGINEERING
DevOps & Cloud
LOW-CODE/NO-CODE DEVELOPMENT
INDUSTRY
FRONTEND DEVELOPMENT
CLOUD DEVELOPMENT
MOBILE APP DEVELOPMENT
LOW CODE/ NO CODE DEVELOPMENT
EMERGING TECHNOLOGIES



Ever feel like your React Native app is moving slower than it should? Maybe the code is tough to read, or even harder to change? You aren't alone. Many developers run into these issues. But there's a fix.
React Native is a popular tool for building apps that work on both iOS and Android using one codebase. This saves time and resources. It lets you reuse code, making things faster. It also makes it easier to keep your app looking and working the same on different devices.
This article looks at key React Native practices. These tips will help you build apps that run smoothly, are easy to scale, and are a joy to maintain.
In coding, there are no hard rules, just the best practices. They help developers write clean and easy-to-maintain code. While following those rules isn’t mandatory. Experienced devs tend to follow them to avoid common pitfalls.
When you’re new to coding, it’s easy to skip over best practices (or guidelines). After all, if your code works, why stress? But, after a point, when your project becomes complex and grows big. You may find it hard to make your codebase maintainable. So, if you stick to the standard practices from the start, your app will be well-organized. You and your team will be able to change it without much trouble.
What are its best practices? Simply put, they’re a set of guidelines.
They help you build scalable, maintainable applications. For React Native developers, there are some methods, guidelines, and approaches to build a scalable app. In this article, we’ll go through these best practices in detail and learn how they can improve development.
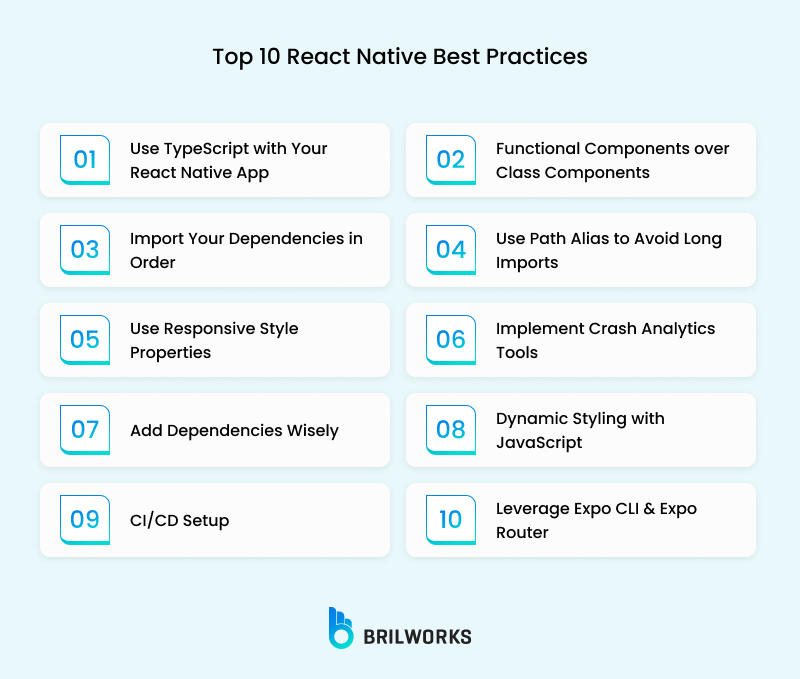
If you want to build an easy-to-maintain and scalable React Native app, these practices are a must. By using them, you will be able to write code that is easier to debug. Plus, other developers can understand your code easily, resulting in better team collaboration. Here, we'll go over some best practices that will make developing your app easier.
Take advantage of TypeScript for type safety and maintainability in React Native development. TypeScript is a statically typed extension of JavaScript. It makes type safety a requirement, meaning that the variables you are using are of the type you expect them to be.
This can be a great time-saver when it comes to debugging. You will not need to go through all your variables to check if they are of the right type. You can code at the double with its auto-completion functionality.
In addition, you can integrate it with common React Native libraries and third-party APIs. To learn this, let's see a simple function that computes the order price in a React Native application.
function calculateOrderPrice(order) {
return order.price + 1200;
}
This method functions, but it is still not clear. We can't be sure if the order object even has a price field, and if it does exist, we don't know its type. The app might crash when it tries to run if the field is missing or its value isn't a number.
This could happen, for example, when you try to show a UI element that uses the result. Let's see how TypeScript sets up the order structure to make sure the types are safe.
interface Order {
price: number;
name: string;
taxPercentage: number;
}
function calculateOrderPrice(order: Order) {
const { price, taxPercentage } = order;
const taxValue = price * taxPercentage;
return price + taxValue;
}
After that, TypeScript makes sure that the order matches the type { price: number name: string, taxPercentage: number }. Your code editor warns you about mistakes when you input a wrong object or misuse a property, preventing crashes.
Plus, autocomplete shows you the fields you can use, making it simpler to add things like name to a <Text> component. This clear and safe approach makes TypeScript a must-have for big growing React Native apps.
Functional and class are two important components of React Native. However, it's better to use functional components over class. The reason is they are uncomplicated, short and sweet, and faster than class components. In this way, you can write a code that can easily be read, written, and tested.
Plus, the performance improvement they provide is a plus. There is one more reason that class components are more tricky than functional components. Therefore, often have a longer and more involved learning curve.
For these reasons, functional components are preferred to class components in React Native.
However, you'll still require class components when working with old code written for class components.
Class Component Example:
import React, { Component } from 'react';
class ClassComponent extends Component {
constructor(props) {
super(props);
this.state = {
count: 0,
};
}
incrementCount = () => {
this.setState({ count: this.state.count + 1 });
};
render() {
return (
<View>
<Text style={styles.h1}>Class Component</Text>
<Text>Count: {this.state.count}</Text>
<Button title='Increment' onPress={this.incrementCount}/>
</View>
);
}
}
export default ClassComponent;
In this component class example, we're using the Component class to define a component. State is handled inside the constructor. The render method specifies the UI of the component.
Functional Component Example:
import React, { useState } from 'react';
const FunctionalComponent = () => {
const [count, setCount] = useState(0);
const incrementCount = () => {
setCount(count + 1);
};
return (
<View>
<Text style={styles.h1}>Functional Component</Text>
<Text>Count: {count}</Text>
<Button title='Increment' onPress={incrementCount}/>
</View>
);
};
export default FunctionalComponent;
This is an example of a functional component. It applies the useState hook to manage state using React. The component describes a simple JavaScript function that will return JSX to render the UI.
Function components are easy to write and quite manageable. In the long run, it means you will have less boilerplate code. Moreover, it goes hand in hand with the new React ecosystem.
Not only that, but they are quite easy to optimize and test. Using this will improve your development process and provide more readable code.
Imagine you have a single file with many imports. If the dependencies aren’t in order, it can be a lot of effort and time-consuming to find a specific file.
Keeping them in order is a very important practice that many developers overlook. It’s a must-have in standard practices and is essential for writing clean, manageable code.
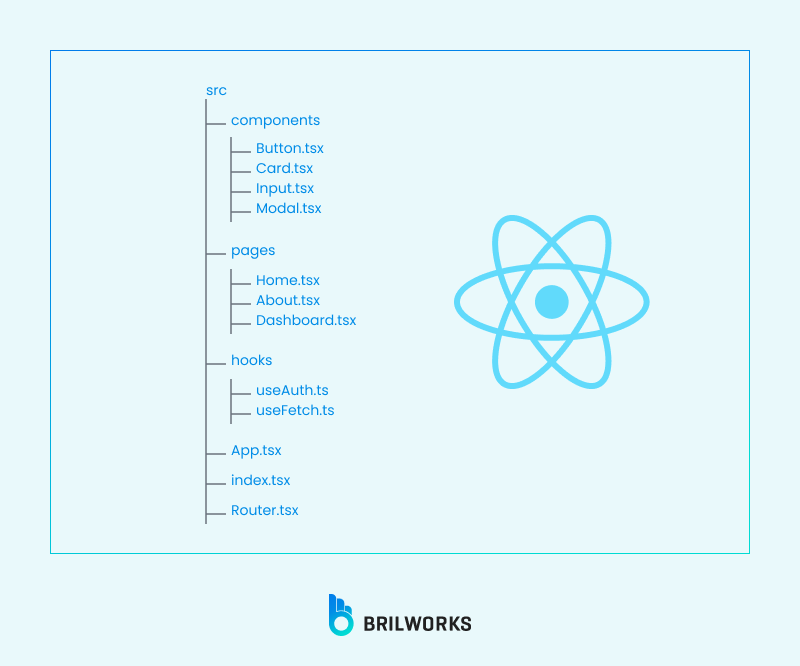
Here's an example of how you can organize your imports:
External imports — react
Internal imports, like relative paths — ../button
In folder imports like ./styles.ts
The imports may be sorted alphabetically in every group
Every group must be divided by white space
import React from 'react';
import { TouchableOpacity, View } from 'react-native';
import { Button, Card } from '../components'
import { MainLayout } from '../layouts'
import { StyledCard } from './styles.ts'
To avoid such issues, You can use formatting tools like Eslint and Prettier to automate and enforce the correct import order.
Path aliases are a way to create short yet descriptive import paths. Many developers struggle with managing nested folders, and path aliases help reduce that effort. Here's an example to understand it better. For example, instead of writing a long import like this:
import { IconButton } from '../../components/buttons';
Using path alias we can shorten the import like this
import { CircleButton } from 'components/buttons';
OR
import { CircleButton } from 'buttons';
Here’s how you can set up path aliases in both TypeScript and React Native to create shorter and more meaningful import paths in your code.
Create or update the tsconfig.json file in your project if it doesn't exist already.
Set the baseUrl to . , which represents the root of the directory. This sets the starting point for all path aliases.
Add path aliases to the paths object. In this example, we have two path aliases defined:
// tsconfig.json
{
"extends": "expo/tsconfig.base",
"compilerOptions": {
"strict": true,
// Path alias config
"baseUrl": ".",
"paths": {
// This needs to be mirrored in babel.config.js
// Components is a directory with sub directories
"components/*": ["src/components/*"],
// We want to expose the exports of the buttons index file
"buttons": ["src/components/buttons/index"]
}
}
}
That will allow TypeScript to parse the following:
import { CircleButton } from "components/buttons"
import { CircleButton } from "buttons"
First, install the babel-plugin-module-resolver as a developer dependency
yarn add --dev babel-plugin-module-resolver
npm install babel-plugin-module-resolver --save-dev
Now, we can update the babel.config.js file to use the module-resolver plugin and point to our directories.
// babel.config.js
module.exports = function (api) {
api.cache(true)
return {
presets: ["babel-preset-expo"],
plugins: [
[
"module-resolver",
{
alias: {
// This needs to be mirrored in tsconfig.json
components: "./src/components",
buttons: "./src/components/buttons",
},
},
],
],
}
}
Responsiveness is when you create an app that adjusts to different screens, resolutions, and orientations. Apps are executed on different devices, ranging from tiny phones to huge tablets, on different platforms such as Android and iOS. Therefore, it's important to make your app responsive.
In development, CSS media queries are used to add responsive properties, but in React Native, you rely on JavaScript-based styling.
One effective way to achieve responsiveness is by using a library like react-native-normalize.
By choosing this library, you don't need to calculate the screen sizes manually. It does the heavy lifting to allow you to maximize your time on implementing complex features.
You could still use other methods and libraries as well. Dimensions is an API that gives you the device's screen width and height from which you can create dynamic styles. Alternatively, percentages will also work for units instead of fixed number pixels.
There are some other options as well, but out of those, if we recommend one, react-native-normalize is a good one in regard to being easy to use, and then you may refine it through Dimensions or use percentage-based layouts for complex designs. Thus, it would be an easy option to adapt a responsive design, which is very, very important.
Plugging these into your React Native app isn’t just nice-to-have; it’s a lifeline. Many times, uncaught JavaScript errors cause React Native apps to crash, and finding errors in a heap of code isn’t easy. Without a crash analytics tool, this process becomes even more difficult.
Below, we have listed some of those important tools that you may want to check out. Of course, there are more, and you might even have a favorite. Overall, a crash analytics tool is essential for effortless development.
Sentry’s good for real-time crash tracking. It shows where your app exactly broke. It logs what the user did before the crash (e.g., tapped a button, switched screens) and bundles similar crashes into groups so you’re not chasing duplicates. For React Native, it’s gold because it bridges the JS-native gap, catching stuff like a bad FlatList render or a native plugin crash.
Crashlytics is Google’s lean, mean crash-fighting machine, built for React Native with minimal setup. It flags both fatal crashes and non-fatal errors, tying them to device details and user impact. You’ll see trends, like if 80% of crashes hit Android 14 users and auto-groups errors by root cause. It’s perfect for React Native’s ecosystem since it plays nice with Firebase’s other tools (e.g., Analytics) and handles native crashes from dodgy third-party SDKs without breaking a sweat.
Instabug provides detailed logs (stack traces, network calls, and even UI state). Plus, it lets users report issues with screenshots or recordings straight from the app..
Pick Sentry if you want deep diagnostics and team workflows, Crashlytics for a lightweight Firebase tie-in, or Instabug if user feedback’s your jam.
Dependencies are external libraries or packages that serve a particular function and better organize the code while reducing the time to develop the code. It can quickly enhance the development process.
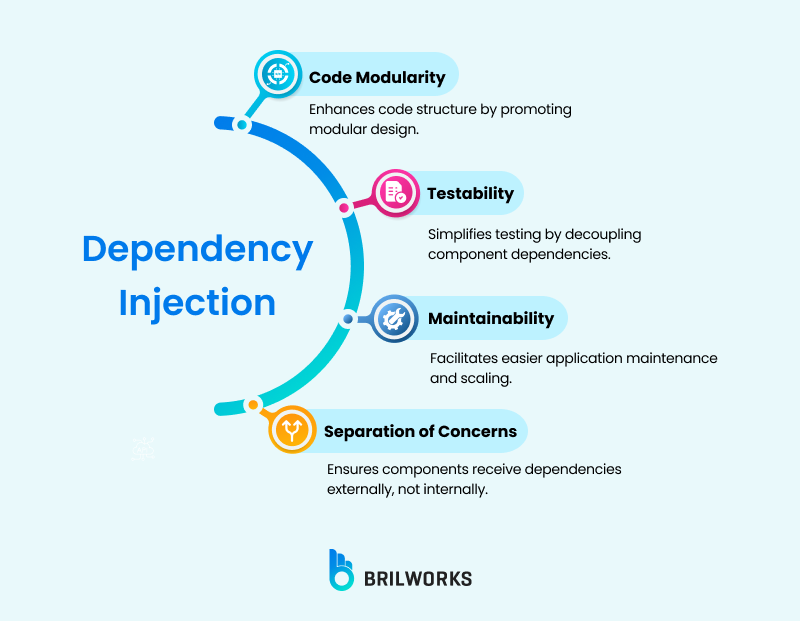
Yet, too many dependencies or old dependencies will negatively influence the performance of an app. So it is a balance - how much do you need to keep it all running smoothly?
You can use npm-check package to check the health of all the packages used in your project; it will check outdated dependencies and flag any outdated or unused ones.
How to check outdated dependencies with npm-check
To ensure your dependencies are up to date and remove unused ones, you can use the npm-check package. It helps identify outdated, missing, or unused packages in your project.
Run this command to install npm check npm install -g npm-check
Run npm-check -u to check outdated dependencies interactively
In this way, all outdated or not-used packages in your React Native application can be seen. With their list with you, you can remove or update according to your requirement. This helps to improve the performance, security, and compatibility of your app.
Android and iOS take care of fonts, layouts, and navigation in different ways, so it's good to ensure that your app functions well on both platforms without big changes.
React apps are dynamic, as they can change based on real-time adjustments. For instance, when a button is clicked, an element can change right away.
Now, static styles can't achieve this feature at all. However, with dynamic styling, you can create components that are dynamic and adapt based on user actions or data changes.
If you are willing to create dynamically styled components, there are multiple approaches you can take.
You would be able to put CSS within your JavaScript using tagged template literals in case you opt for styled-components.
Following this method, you're able to manage styles within components, and dynamic styling is enabled with ease. Since styles are written within JavaScript, you can use variables and conditional statements to alter styles due to state changes and user interactions.
The advantages of adopting styled-components are as follows:
Write CSS in JavaScript directly through tagged template literals.
Encapsulate and manage styles within components.
Employ variables, conditions, and props for dynamic styling.
Scope styles to prevent conflicts.
Enhance code readability and maintainability.
Android and iOS have different approaches to things like navigation, layouts, and fonts, so you need to ensure your app runs effectively on both platforms with minimum alteration.
In some cases, you may require platform-specific code for specific functionality. You can employ:
Platform.select in order to use varying styles or logic depending on the platform.
react-native-device-info to identify the device and change behavior based on that.
For styling, don't use fixed pixels; opt for percentage units or libraries like react-native-normalize to have layouts that are consistent across screen sizes.
Android also adheres to Material Design, whereas iOS has a flat design aesthetic. Using a library like react-navigation helps to have a seamless flow in both.
To make sure that everything works as expected, test your app on emulators and real devices, and utilize crash analysis tools like Sentry or Firebase to detect platform-specific bugs early.
CI/CD, or Continuous Integration and Continuous Deployment, are techniques that enable developers to develop software more efficiently and reliably.
Whenever you modify the codebase, CI/CD pipelines run tests and build your application to ensure that all checks are green before deploying the recent changes. This avoids bugs and makes sure that your application is always up-to-date.
By having the CI/CD pipeline set up in Github/Gitlab/Bitbucket and having EAS Build and EAS Submit part of the CI/CD pipeline, you can save a significant amount of development time.
By doing so, you can build automatically whenever code is merged into the master branch or initiate the pipeline once code is pushed to the master branch.
This is how it goes.
EAS Build builds your React Native codebase on Expo public servers into production builds for iOS and Android. It also signs the build—a digital sign-off by a developer that code for an app hasn't been modified since the last time it was submitted, which Expo handles programmatically.
EAS Submit, on the other hand, allows developers to submit their app to the Play Store or App Store with ease once it's built
Expo is a widely used framework for developing native Android, iOS, and Web apps with JavaScript and TypeScript. It makes development easier by taking care of much of the setup and configuration for you.
Typically, iOS app development needs Xcode, and Android app development needs Android Studio, but with Expo, you don't have to install or set up these tools to begin development.
Rather than creating an emulator or installing manual builds, you can utilize Expo Go, an application that allows you to execute your project directly on a physical device. Here's how:
Scan the QR code produced by Expo's development server with the Expo Go app.
Your app will be loaded on your device without requiring a full build process.
By utilizing it, you can streamline the development process by delegating much of the underlying setup and configuration to Expo.
Expo has a number of key features:
Expo Go
Over-the-Air (OTA) Updates
Managed Workflow
Prebuilt APIs
Cross-Platform Support
EAS Build & Submit
Use Expo Snack whenever you require rapid prototyping and team collaboration. It is an online editor that allows you to write and test React Native code within your browser with no setup. You can develop interactive demos, try out components, and debug isolated bugs without having to run a full development environment.
Expo Snack also makes it simple to share your work. You can create a shareable link to send your project to coworkers or test it on a real device in an instant. Whether you are testing out new ideas or debugging a particular issue, Expo Snack facilitates accelerated development and collaboration.
React Native uses Expo Router, a file-based router, to make navigation a much easier task. The router avoids the chore of manually creating all of the routes, organizing the files, and setting up the paths for navigating between screens. Expo Router lets you create the routes automatically, saving you time and streamlining the navigation.
React Navigation provides the features and functionality that make cross-platform app building more effective. It does this by supporting a common set for both React Native and the web. It also includes deeplinking to help users navigate more efficiently, as they are not constantly starting from the app's entry point, which makes the app even better.
Solid testing strategies are crucial because they make the application development process smoother and more efficient. You might already be familiar with some smart testing strategies. Let’s explore the various testing methods available for React Native applications.

Static analysis involves examining the code before it’s run to identify potential errors, ensure adherence to coding standards, and enhance overall code quality. For a platform like React Native, which relies on JavaScript—a dynamically typed language—issues such as undefined variables or type mismatches can be subtle and difficult to detect. Static analysis helps catch these problems early, preventing them from escalating into larger issues later.
Tools such as ESLint and TypeScript are widely used for static analysis in React Native projects. They analyze the code without executing the application.
Using static analysis makes your project more effective and reliable. In React Native projects, it optimizes resource utilization, adding to the overall reliability of the application. It is particularly important in bigger projects, where the codebase is large and ensuring consistency manually becomes a difficult task. Static analysis catches errors early on, thereby:
Prevents common mistakes,
Fosters team alignment on coding standards,
Reduces the time spent on debugging.
Unit testing is all about checking separate functions or units in isolation, making sure that the app's underlying logic is working as it should. In React Native, this is essential for testing utility (e.g., calculations) or independent UI components (e.g., the behavior of a button), ensuring confidence in separate units of functionality.
Custom tools such as Jest allow a developer to write tests that run particular bits of logic or render components without the device or emulator. These tests specify the expected results for specific inputs and can monitor a component's shape over time to catch unintentional changes. It is quick and occurs in an environment that is controlled and separates out the dependencies.
Unit testing is a staple of React Native development because it is easy and fast. It verifies fundamental functionality early, decreases regression risks, and enables modular design. Through assurance that individual components behave as desired, it provides a solid groundwork for additional testing layers, aligning with strong development practices.
Component testing tests React Native components individually but in an environment more like the app's runtime environment than unit testing. It makes sure that components will render properly and react to user input correctly, filling the gap between logic validation and actual use.
Tools Utilities such as Enzyme or React Testing Library mimic interactions (e.g., taps or input changes) and check the output or behavior that follows. Unlike unit tests, this can sometimes mean rendering components with mocked props or state, simulating how they'd behave in the app while still keeping them isolated from other components or external systems.
This test is most important in React Native for UI behavior and interaction correctness verification. It detects rendering errors or event-handling bugs that unit tests would not catch, making components behave reliably in a standalone manner. Implementing this improves code quality and user experience and is, therefore, a pragmatic step towards creating reliable interfaces.
Since complex systems can break in a multitude of ways, we conduct integration testing in our app to make sure that integration points don't fail, especially in complex systems where this is a common risk. This ensures that all the separate components, like navigation, state management, and the UI, work together properly. It also validates all the functionality.
These tests combine several components, often with mocked external dependencies (e.g., APIs), to simulate interactions. They are more intricate and slower than unit or component tests as they evaluate workflows across boundaries, such as data passing between a form and a display component. Tools vary, but Jest with additional utilities is frequently adapted for this purpose.
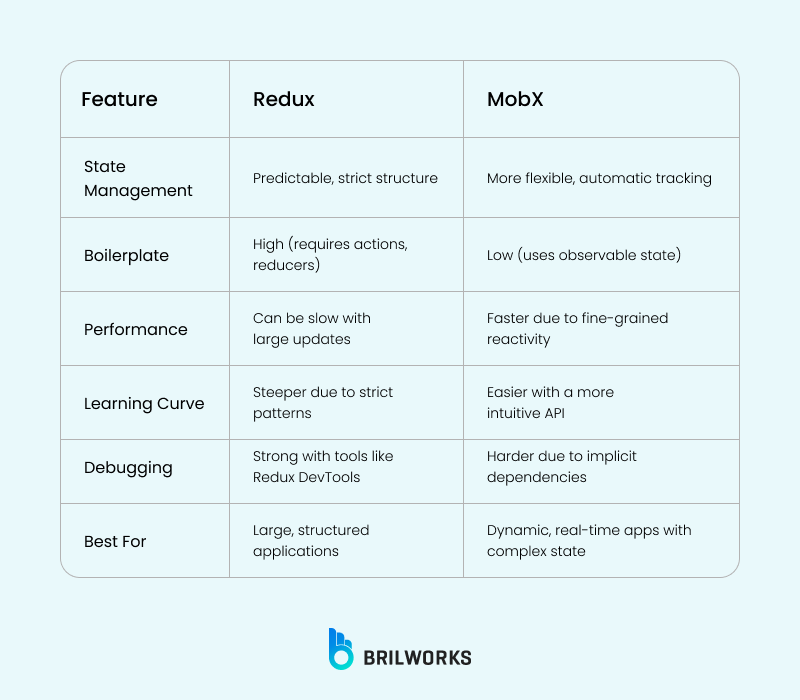
In ReactJS, state management refers to how data is stored, shared, and updated across components. For local state within a component, hooks like useState and useReducer are commonly used. When you need to share data across multiple components, the Context API offers a simple solution. For more complex needs, third-party libraries like Redux, Zustand, or Recoil provide structured ways to manage global state. React Query or SWR are ideal for handling server-side data, like API responses. Additionally, URL state, managed through tools like React Router, helps handle route-based data like query parameters.
This is the most complete method of testing a React Native application. You can simulate any possible user actions, including integration with external services, APIs, databases, and performance differences across devices. Developers use Detox and Appium quite a lot because they are able to emulate user interactions on actual devices in order to conduct more precise tests.
Use a consistent code style. This makes your code easier to read.
Write comments to explain complex logic. This helps other developers (and your future self) understand your code.
Code Reviews and Pair Programming
Write code that is easy to read and understand. This makes it easier to maintain and update your app.
Use environment variables or a secrets management solution. This keeps your API keys out of your source control.
Use regular expressions to validate email addresses and phone numbers. Remove or escape special characters from user inputs.
Use react-native-keychain to store data in the device's keychain or keystore. This is more secure than storing data in plain text.
Use console.log statements to print values to the console. Step through your code with the debugger to find issues.
React Native Debugger and Flipper are great debugging tools. They let you inspect your code and variables.
Unit tests check individual parts of your code. Jest is a popular testing framework. React Native Testing Library helps you test components.
An HOC can add authentication logic to multiple components. This avoids repeating the same code in each component.
Following these React Native best practices might feel like a lot. But these are worth it. Your apps will run better, be easier to maintain, and more secure. For developers, it is most important to master these practices since without them, it is challenging to write scalable code. Yet, they are not the only best practices, there are newer practices emerging continuously. With increasing demand for React Native, it can help developers take their app development skills to an even better level.
Brilworks is a top React Native development company. We have made contributions to frameworks and assisted companies in resolving intricate performance issues. Our experts develop high-quality applications with innovative solutions.
Making your app fast and responsive is super important. Slow apps can frustrate users. They might even stop using your app.
React Native excels at developing cross-platform mobile applications with native-like performance. It's ideal for projects requiring rapid development, code reusability, and a large, active community. It's particularly well-suited for apps with complex user interfaces, smooth animations, and the need to reach both iOS and Android audiences with a single codebase.
React Native offers several key features that contribute to its popularity. It leverages React's component-based architecture for efficient UI development. Hot reloading enables rapid development cycles by instantly reflecting code changes in the app. Strong community support and extensive third-party libraries accelerate development. Additionally, React Native's ability to seamlessly integrate with native code provides flexibility for complex functionalities.
Several tools can optimize React Native app performance. The React Native Profiler helps identify performance bottlenecks. Using FlatList or SectionList for long lists significantly enhances scrolling performance. Optimizing images, minimizing re-renders, and leveraging native modules for computationally intensive tasks are crucial. Code splitting, lazy loading, and using Hermes as the JavaScript engine can further improve app speed.
React Native offers several options for navigation. React Navigation is a popular and feature-rich library providing stack, tab, and drawer navigators. It supports custom transitions, deep linking, and header customization. For simpler navigation needs, the built-in Navigator component can be used. Understanding the project's specific requirements and desired user experience is essential when choosing a navigation solution.
Get In Touch
Contact us for your software development requirements
Get In Touch
Contact us for your software development requirements